2011-04-06

WebGL - Convert chars to float

 All info is derived from:
http://www.khronos.org/registry/typedarray/specs/latest/


The basic problem, is you create a vertex buffer object (VBO) and write vertex data into it, such as vertex position, texture coordinates, normals, and weight and weight index values.
In case you have never used a "matrix palette" the basic idea is:
  • Construct a VBO with space for your weights and weight indices (4-8 floats)
  • Convert your weight values into floats, store in your array,
  • For the index values, convert to uint8 values, which refers to the shader' current matrix palette
    • This is defined as an array of uniform matrices; usually less than 28 matrices long
    • all GPU bone animation routines do this internally, ultimately.
  • Then, before you draw a group in your polygon, load the palette with the matrices needed.
  • In the shader, simply multiply with your input vertex to compute the output vertex, and multiply each stage with the weight required.
It doesn't take a of lot of inspection to see multiple problems. For one, you are limited by the number of weights applied to a vertex, and you need multiple shaders for each count, such as matrixshd1, matrixshd2, and so on. You also have to load the uniforms in for each group that changes the matrix palette. Also, depending on your shading pipeline, you have to multiply and convert the matrices before sending to the GPU.

All those problems aside, and you suddenly realize that in javascript, there IS no way to convert bytes into a float. In C, this was typecast trickery.

Here is (one way) convert arbitrary bytes into a float for your VBO data:

function utilUCharToFloat( inarray ){

//Step 1: Create a un-editable array buffer (in bytes) of size 4

var n = new ArrayBuffer(4);

//Step 2: Create a "view" of that buffer as a Uint8 view.
//This allows you to write into it as bytes.
//We choose a 0 offset, and a 4 length for explicitness

var vb = new Uint8Array( n, 0, 4 )

//Write into it with your bytes

vb[0] = inarray[0];
vb[1] = inarray[1];
vb[2] = inarray[2];
vb[3] = inarray[3];

//Create a new view as a float.
//This view uses the same data as the vb view, but is read/written to like a float.

vf = new Float32Array( n, 0, 1 );

//The first element, a 32 bit float (8*4 = 32) is returned,

return vf[0];
}

You can do the exact opposite and convert bytes to float using the same logic.

Hope this helps, it's critical to being able to use matrix palette weighting.

-Z

2011-04-05

WebGL - TED DXML importer again

The test file: (Run locally)
http://www.gocaco.com/webgl/test1/Archive.zip

The exporter for blender (Export your own model to test)
http://www.gocaco.com/webgl/igtl_export_ted.py

Instructions:
  • Make a new folder somewhere.
  • Unzip Archive.zip into it. There will be a .html and a.js file.
  • Copy the igtl_export_tex.py into your Blender/scripts directory. (check infopanel for location)
  • Open Blender (2.49b?) and open a model.
  • In blender, File->Export->IGTL TED (.dxml)
  • Change your options, do NOT use JSON mode.
  • Copy your exported file to the new folder.
  • Run the index.html in your browser (doubleclick it)
  • Type in the name of your file in the bottom and click load.
  • Now you should be able to use left drag, right drag and left+right drag to view around.

Now I have added in scene loading so it can load in lists of objects, all of which can move/translate/scale.

Also multi-texture is working, but no shaders are coded yet that use it. That'll be after animations, since animations are done in the shader. This is why the TED exporter is valuable, it automatically splits up your mesh into groups by material, seams, and matrix palette seams.

Here's a random scene I made. Don't make any comments about old school games, yes I know what "Dungeons of Drax" is. If the shaders were working it would look better.


Animations next...
-Z

2011-04-04

WebGL - TED DXML importer

So I redid some javascript; Now I have a stronger preliminary system for loading data from TED files. It's scary fast, and impressively so. (The GL part anyways)

So, make sure you export ONLY data in the TED format, not the JSON format. Use the TED format because it's a lot easier to read and understand, and it's not much less efficient than a JSON file (Maybe 1% tops).

You must export your own test model for now, from blender. Download the source here to try it on your local machine

TED Exporter (test 2.49b, not yet 2.5* compatible):
http://www.gocaco.com/webgl/igtl_export_ted.py

Download the python file, put it in your blender scripts directory (blender/.blender/scripts for me) or add it on to your 2.5 (not tested, API not stable)

Then open any file you want, and select some objects, then File->Export TED.
You may want to poke through the python a little to read something about what it does.
Save your exported ted file (All ted files are UTF-8 ASCII only, so always human readable) and place it wherever you extracted the source index.html.

Then, just enter in the name of the file and click load, nothing nothing breaks.

You should be able to fly around a (currently non-objected) world with left mouse and right mouse drags, left+right mouse is zoom, left is rotate, right is pan.

I do not yet have the scene objects loaded, nor do I have the animations active. That's next. But this is progress, I can now load data into the webgl, that includes models, textures, and animations.

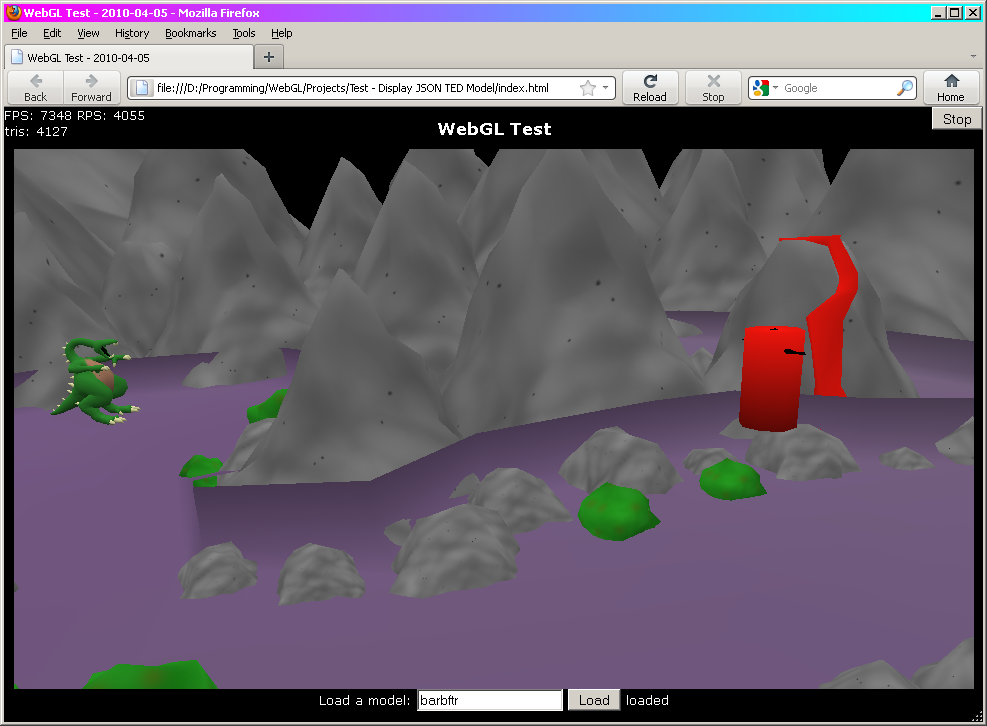
Here's Gigginox from Monster Hunter 3. Not doing much.

-Z

2011-04-02

WebGL - Blender Exporter to JSON format

EDIT (2010-04-03): JSON is a bad format. I'm remove support for it in favor of the XML already in place. XML parsers read DXML easily, so the original TED files remain as is. Reason: JSON cannot handle multiple nodes with the same name. Crippling.


Since I already have a very heavy exporter built for blender, and it just so happens to be in the DXML format, I can directly convert it to a JSON with almost no loss of information.

So, if you are frustrated with not having a prebuilt Blender -> JSON exporter, use mine (or copy + improve on it).

The download link is always on the right hand side of my blog, or here since this post is about the exporter:

http://www.gocaco.com/temp/igtl_export_ted.py

You might wonder "why do I want yet another stupid format". GOOD QUESTION.
The "TED" file is designed to mimic hardware formats.
It exports:
  • Optimized mesh data (automatically splits along UV seams, and material seams, and matrix palette splits. Exports vertex, texcoord, normal, tangent, weight, weightindex, maybe colors)
  • Material information (As much as possible for now, needs improvement)
  • Armature data (all of it, including IK chains)
  • Animation data (All actions that fit an armature)
  • Frame actions (You can make text files with scripts that can act as data for animations)
  • Textures (Can be converted to text and put in the file)
  • Scenes (Converted exactly as shown)
  • Objects (including game properties! And links to data.)

So, it's also all fairly logical. You will have to play with it to get used to it, especially for you novice's out there. Reading through the exporter (find the "const_DTD_ted" declaration) and looking at what the data is should help. Try exporting a regular TED file first, and open it with any text editor. DXML files are regular, very restrictive XML files to promote consistency and easy of reading. It should be immediately obvious how to read them in.

More importantly, for you beginners, the data exporter from the TED exporter is everything you find normally in any commercial game out there. This includes X360, PS3, Wii games, as I have tested and proven myself.
It does NOT export some advanced features, because blender does not have those features yet. Bother blender.org about that if you want more functionality with muscle/keyframe animation.

If you do end up using this, enjoy. Please drop some credit somewhere; there are no restrictions or guarantees to this script. It's 100% free as in free beer.

A early preliminary test:

I will add a animated test soon.

-Z

2011-03-29

WebGL - YES!

First, go here to update your Firefox (or use Chrome):

http://www.mozilla.com/en-US/firefox/all.html

In firefox 4.0, you have to enable this feature manually,

First type in "about:config" in the address bar,
     Don't let it scare you,
     Sort the items by name,
     Find the "webgl.force_enabled" and double click that to make it true.


Now, go find some sweet OpenGL ES 2.0 type demos.

!!! ACHTUNG !!!

--> Make absolutely sure you have the NoScript AddOn (http://noscript.net/) for firefox first. This will allow you to STOP content from automatically loading, just in case you are like me and are trigger happy.

http://www.khronos.org/webgl/wiki/Demo_Repository
http://www.chromeexperiments.com/webgl

This is great because it eliminates the need for stupid plugins like Unity, Flash, Shockwave, Java, ect...
Now you can use the ECMA script (Javascript) built into the browser to make full powered 3D games, which now are compliant to any browsers that use them!

This is serious cool. I'm totally making something in this.

-Z

2011-02-12

Synology DS 1511+ - More fun

So far, everything has worked like a champ. The Media server is seen by the PS3, and although the PS3 sucks bawls when it comes to format compatibility, when it CAN play something, it does seamlessly.

We ran a blue ray movie off the Synology, to see how fast it could throughput. The router isn't fast enough to even begin to test, I'll have to get a switch and some better networking equipment before I can.

So, to compensate, we watched a blue ray movie WHILE uploading a blu ray, and had two sources pulling and 1 uploading.

No chokes or anything. A consistent, router limited 10 MB/s.

So that was great.

However, if you setup this unit for FTP, make sure to follow synology's instructions and use filezilla, otherwise you'll get frustrated with other shitty FTP programs.

I still like it so far. It's fast, efficient, very quiet, it's amazingly silent for what it's doing, though the clicking is inevitable in any system.

The temperatures are about 98 98 100 100 99 Fahrenheit in the unit itself under blue ray playing mode. So that's really decent. Ambient room temp is 70 Fahrenheit.

HOWEVER

I encountered one problem, but not with the synology DS1511+. The problem is, VLC.

VLC does not seem to support UPnP/DLNA browsing/playing! What the hell!
I googled this, and found either they do not have enabled, since it seems there are builds with it, or it is not working for just windows.
I was able to download XBMC (oh god I hate it) and it worked fine with the synology, no problems, minus I absolutely hate that media player. VLC spoils you, really!

For example, when watching the dark knight on blue ray, we randomly skipped about and sped up/slowed down the playback and added filters. Still good, though seeking took a moment, naturally. But no longer than I would have expected.

Windows XP Pro seems to SEE the UPNP server, but I don;t have any programs that can browse / pull data off it.

This is a crippling problem, and I want VLC to stream from the NAS.

In unrelated news,

I made the candied citrus peel recipe from the "Desserts By Pierre Herme" awesome cookbook I have; And, OH MY GOD they are amazing. I don;t know what I did wrong, if anything, but caramel + orange + candied is absolutely something else. It's incredibly tasty, and super addicting. Once they all dry, I'll coat them in some crappy ass commercial dark chocolate like Hershey's special dark or something. Maybe.

I'm definitely making these things more often. And I'll quantify the recipe so I can replicate it.

-Z

2011-02-09

Synology DS 1511+ - Playing around

So, 10TB of a RAID 6 resulted in 5.44 TB of usable space; and it only took about 7 hours to parity check, maybe 1 to build! If you think about it.

10TB / 8hr => 364 MBps

Which, my poor ass router can't go that fast.

So the thing is fast. I started formatting and toying with settings and stuff, uploading movies and music to test it's integrity.

Pending results from the UPnP test with some PS3's.

Remove the DNS so the box is intranet only, which is awesome.

Here's what it looks like in action, using Synology's DSM web interface:


I'm a little hesitant to enable the transcoding on it, but we'll test it out while it's still fresh.

Great job so far guys, this is the best tech product I've ever used. Props Synology!

-Z

2011-02-07

Synology DS 1511+ - Initial Setup

So, the unit arrived this afternoon.

after a greedy session of package unwrapping, I uncovered the DS1511+ itself.

It looks a lot better than the picture.

Everything is exactly as stated. I had no problems opening the packaging, the instructions were all in a .pdf, easy to follow, the drive sleds were a little flimsy feeling, you have to really be gentle with them.

Basically, you unlock the bay, push in the bay, and it pops out making it easy to slide out. Then, you screw in the hard drive (rubber grommets don't fit for noise abatement, need that fix.) And slide the sled back in, and push the clip back down.

It took me a few tries on the first drive to get it push back enough before it would click back, slightly frustrating, but  it only happened the first time and was user error.

With all the drives in place, I carted the unit into the NAS Room, and setup the UPS for the unit.
The UPS is manditory for any kind of storage operation, since if the power fluctuates, you need a battery backup to keep the unit running until it can shut down and suspend proporly.

I plugged it all in, and installed the Disk Manager software.

Now this part is a little hairy, but my systems have auto-everything disabled. So, I manually allows the autorun, and a little splash window popped up, and you click a big install button. Wait a minute, then you detect your NAS.

Initially, nothing. I check the ethernet cable, and I guess it had wiggled out. So be careful with those ethernet cables, make sure you have a good connection physically.

After that, it blinked on, and I logged in.

From there, it got easy. The Linux OS they use is really damn clean. It works through a web browser nicely, I had 0 trouble using it. Was like home.

More interestingly, is that using a OS like that in a web browser (aside from being really stupid imo) was insanely easy to do. Kinda like using a strong VNC/RDP connection.

So, I clicked arround, made some user accounts, setup  the RAID6 array, and let it go ahead and check everybody for errors.

So, it should be done tonight.

I'm impressed with this product. Using their software online as a testbed was a good way to test it, and getting the unit in a flawless configuration was a really nice bonus as well.

The next test will be to load it with data, and yank out a drive to see how it rebuilds.

BUT, I probably don't need to do that. It seems perfectly fine to me, I'd rather make sure the UPnP stuff works for the PS3's and the Mac in the house, so I can stream stuff to em.


SUMMARY PROS:
  • Easy Setup Physically
  • Amazingly easy software setup
  • Works so far
  • Unusually quiet
  • Able to add DX510 units to expand the unit's capacity greatly (26 TB theoretical! 16 TB probably max due to FS problems)
 SUMMARY CONS:
  • Drive bays a little flimsy
  • No anti-noise grommets for hard drives, nor is there room to add any
  • Uses a web interface (However, it has a VGA port and USB ports, I bet you can run it with no web interface. Not yet tested.)
  • Filesystem limitations come into play unless you smartly divide the drive out. Which is really hard to do, initially.
SATISFACTION: Yes

Until next update!

-Z